Specifications
Design
Range of product
PowerLogic
Range
PowerLogic
Product or component type
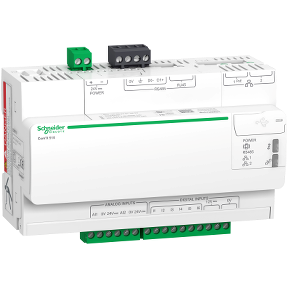
energy server
Physical
Communication network type
- RS485, Modbus serial on 1 RJ45
- RS485, Modbus serial on terminal block
- Ethernet, PoE 15W (Power over Ethernet) on 1 RJ45
- Ethernet, DHCP on 1 RJ45
Mounting mode
clip-on
Mounting support
35 mm DIN rail
Product certifications
- C-Tick
- cUL
- UL
- CE
Standards
- EN 60950
- EN 61010-1
- UL 508
- UL 60950
Depth
69 mm
Height
109 mm
Width
144 mm
Net weight
450 g
Local signalling
- LED: for power supply
- LED: for status (GPRS)
- LED: for communication (Modbus)
- LED: for communication (Ethernet)
- LED: for communication (WiFi)
- LED: for I/O
Relative humidity
5...95 % at 55 °C without condensation
Ip degree of protection
- IP20 (terminal block)
- IP40 (front face)
Ambient air temperature for operation
-25...70 °C
Ambient air temperature for storage
-40...85 °C
Reach free of svhc
Yes
Eu rohs directive
Compliant
Toxic heavy metal free
Yes
Mercury free
Yes
Rohs exemption information
Yes
China rohs regulation
X
California proposition 65
WARNING: This product can expose you to chemicals including: Lead and lead compounds, which is known to the State of California to cause cancer and birth defects or other reproductive harm. For more information go to www.P65Warnings.ca.gov
Documents & downloads
hide showFilter items
-
All
-
CAD Files and Packs
-
Product Brochures
-
Other technical guide
-
Installation Instruction
-
Operating Manuals
-
System User Guide
-
Application Notes
-
Declaration of Conformity
-
Firmware
Frequently Asked Questions
hide show
The Default Password and Username for ComX 510 are:
User = admin
Password = admin
See link for further Product information:https://www.se.com/au/en/product/EBX510/comx-510---energy-server---ul---sdram4-go/

User = admin
Password = admin
See link for further Product information:https://www.se.com/au/en/product/EBX510/comx-510---energy-server---ul---sdram4-go/

1. Please refer to the details in the ‘Modbus TCP Access’ section in the Com’X510 User Guide .
2. Please double check all the slave devices have been set with the same serial settings (Baud rate, Parity, etc.) as the Com’X510 ‘Modbus Serial’ settings (Settings > Communication > Modbus Serial.).
3. Configure the Com’X510 ‘Modbus Gateway’ setting as follows.

4. Please make sure ‘Enable Serial Modbus Broadcasts’ is enabled.

5. Please note that the ‘Enable Modbus TCP/IP on Ethernet’ setting in the ‘Firewall Management’ section is also enabled for the required port.

6. You can check and confirm the Gateway behavior by communicating to the slave devices using Modbus Tester and simply reading registers using the IP address of the Com’X and the Slave ID. Please see below example.

2. Please double check all the slave devices have been set with the same serial settings (Baud rate, Parity, etc.) as the Com’X510 ‘Modbus Serial’ settings (Settings > Communication > Modbus Serial.).
3. Configure the Com’X510 ‘Modbus Gateway’ setting as follows.
4. Please make sure ‘Enable Serial Modbus Broadcasts’ is enabled.
5. Please note that the ‘Enable Modbus TCP/IP on Ethernet’ setting in the ‘Firewall Management’ section is also enabled for the required port.
6. You can check and confirm the Gateway behavior by communicating to the slave devices using Modbus Tester and simply reading registers using the IP address of the Com’X and the Slave ID. Please see below example.
Acti9 PowerTag Link C (A9XELC10)
This is a cloud connected communication module which can ONLY be used with Facility Expert Small Business (FESB) app.
There is no webpage access to connect to Acti9 PowerTag Link C. All the commissioning steps are performed through the eSetup for Electricians app which is connected to PowerTag Link C using Bluetooth connectivity.
Please see more details in the PowerTagLink C Instruction Sheet and Facility Expert Small Business (FESB) brochure.
Please note that Facility Expert Small Business (FESB) app is not designed to use in residential applications and not supported for solar applications to see energy export values.***
Also, there is no option to log the kWh consumption data in the app or export them as reports.
Please download the Facility Expert SB app from Google Play or App Store and go to ‘Demo Mode’ to explore more.
*** If you are interested in solution for residential applications with solar, please check out our Wiser Energy Management solution.
Acti9 PowerTag Link (A9XMWD20) / Link HD (A9XMWD100)
These are used to monitor small/medium business electrical equipment via your supervision system through PowerTags Energy sensors.
These can be accessed via a webpage or EcoStruxure™ Power Commission software to configure and set notifications. These gateways itself do not log data.
Alternatively, PowerTag Link/Link HD can be connected to a COM’X 210/510 to connect to a cloud based platform, Facility Expert where you are able to see your energy data as well as your asset status. This platform has a yearly subscription fees and the fee depends on the inclusions in your license.
Please refer the below FAQ video and the PowerTag Link Gateway User Guide.
Set a Panel with PowerTag Energy Using PowerTag Link Webpages
https://www.youtube.com/watch?v=olAqAX8H3U8


